|

- Select which section to go to:
-
- Installing Linux | IDE CD Burner | Web Mail | Linux Router Project | IceCast streaming server
Hard Drive Imaging
Installing your favorite Linux distribution:
We are always ready for a demo/workshop on Linux installation.
Feel free to bring your hardware for installation to our meetings anytime.
What you will need:
PC with 386 or newer CPU, or Mac with PowerPC CPU
Adequate hard disk space
(at least ~500MB if you want X Window System
with all the goodies,
otherwise ~100MB)
Adequate RAM depending on use (at least 16MB in most cases)
Monitor
CDROM Drive
(Optional) Distribution CD
You can buy these real cheap at Cheap
Bytes, Linux Central or Linux
Mall.
If you have no way of getting a distribution CD yourself, it may be possible
that someone can lend one to you during the meeting for installation on
your system.
Or, if you have a network card and a CD-Recorder drive, you might be
able to download a distribution CD iso image at the meeting, and burn your
own copy.
We have access to a nice quick line ;-).
(Please be sure to bring your own blank CD media, and your own ethernet
cable)
So bring your hardware and your questions and we'll do our best to send
you away somewhat more enlightened.
Having trouble finding a NIC that will work?
Check out our list of compatible Ethernet cards.
^ top ^
|
IDE CD Burner Mini How-To
by Kevin Broulette, OCLUG
OK the idea is to have the kernel properly configured and then tell 'lilo' to
not see the drive as a normal IDE/ATAPI device but hold it and use the
ide-scsi module.
First check the cdrom writing how-to for this section:
Sect. Description Module SCSI IDE PP
------------------------------------------------------------
BLOCK Enhanced IDE/MFM/RLL...... Y
BLOCK IDE/ATAPI CDROM ide-cd... M
BLOCK SCSI emulation support ide-scsi... M
BLOCK Loopback device loop... M
SCSI SCSI support scsi_mod Y/M
SCSI SCSI CD-ROM support sr_mod Y/M
SCSI Enable vendor-specific Y
SCSI SCSI generic support sg Y/M
SCSI (select a low-level driver) Y
FS ISO 9660 CDROM filesystem iso9660 Y/M
FS Microsoft Joliet cdrom... joliet Y
and make sure your kernel is set as above. Set the ones above that show
only a 'Y' compiled into the kernel and set the ones with 'Y/M' as modules.
After you make the kernel you can edit lilo.conf and add an append line
as follows:
append = "hdd=ide-scsi"
where 'hdd' is your particular device for your setup.
Now on to /etc/modules.conf add the line:
alias scsi_hostadapter ide-scsi
and reboot: You should be able to 'cdrecord -scanbus' and see the drive
there.
You will need 'cdrecord' and any programs you want depending on if you
want to rip cd's or whatever.
I use 'gcombust' which requires programs like
cdrecord/mkhybrid/cdlabelgen/mkisofs etc...
Since the kernel is built with 'generic scsi support' you can mount the
drive as before with something like this:
mount -t iso9660 /dev/sr0 /mnt/cdrom
where 'sr0' may change depending on your hdware.
I have a tape drive on sr1 and the cdrw on sr0. 'cdrecord -scanbus' will
guide you here.
^ top ^
|
This 'How-to' is based on my setup of a RedHat 7.2 server as an sendmail/IMAP/Webmail
server using as many 'stock' Redhat RPM's as possible. It's based on a stripped down
install using a 'kickstart' floppy and the only non-RedHat RPM's being those for Squirrelmail.
This document assumes that your MX records point to the IP of this server so the email will get to it.
This setup will finalize using approx 385MB of your hard drive and could probably be reduced even further.
I used 'Kickstart' to make the install smooth. It works on my pc so it should be fine on yours.
This How-to assumes the user has the basic skills to configure his Linux server.
-
1] Kickstart disk
- Make a boot floppy from the /images/boot.img on RH7.2 disk#1 using 'dd' or 'rawrite'.
- Empty the contents of "syslinux.cfg" on the floppy and add the following 5 lines:
-
-
- default ks
- prompt 0
- label ks
- kernel vmlinuz
- append ks=floppy initrd=initrd.img devfs=nomount ramdisk_size=7168
-
- Next, create a NEW file on the floppy called ks.cfg and add the following as the contents:
-
- ks.cfg
-
-
Boot up from the floppy with CD1 in the PC and RedHat will begin the install.
You may partition as you like or just 'auto partition' and the rest of the install is done for you.
Put in CD2 when prompted.
-
Lilo auto installs on the MBR and no rescue floppy will be made etc.
I haven't tried this on a dual boot, so just use a dedicated hard drive
as this could remove all the data from your drive.
-
-
2] Reboot after install
-
After the system reboots, you may logon as 'root' with the password '123456'.
Immediately change the 'root' password to something more secure.
The kickstart disk setup the network as a DHCP client so you can setup your specific networking
settings as required by your needs.
-
-
3] Put in all of the Latest RedHat RPM updates. [don't miss this step!]
- Subscribe to RedHat Network or ftp them from a mirror like ftp://mirrors.kernel.org/redhat/redhat/linux
-
-
4] Use 'ntsysv' or 'chkconfig' and enable the following:
- anacron
- atd
- crond
- httpd
- imap
- imaps
- keytable
- network
- random
- rawdevices
- sendmail
- syslog
- xinetd
-
- [Make sure those daemons that do not run through xinetd are up and running.]
- Restart xinetd when you are done:
-
- service xinetd restart
-
- [or just reboot]
-
-
5] Create a new sendmail.cf file. [Thanks Christopher M.]
-
Enable the following 3 lines in /etc/mail/sendmail.mc [uncomment them by removing the leading 'dnl' to look like this]
-
- TRUST_AUTH_MECH(`DIGEST-MD5 CRAM-MD5 LOGIN PLAIN')dnl
- define(`confAUTH_MECHANISMS', `DIGEST-MD5 CRAM-MD5 LOGIN PLAIN')dnl
- FEATURE(delay_checks)dnl
-
- Comment OUT the following by adding 'dnl' to the beginning so it looks like this:
-
- dnl DAEMON_OPTIONS(`Port=smtp,Addr=127.0.0.1, Name=MTA')
-
- Make those chages,save, and make a new /etc/sendmail.cf by running the following:
-
- m4 /etc/mail/sendmail.mc > /etc/sendmail.cf
-
-
Two reasons for the above changes to the default RedHat sendmail.mc are that
the first 3 lines we enabled will allow us to RELAY mail thru our mail server
without it being an 'open relay'. We will authenticate with a valid username
and password to be authorized to RELAY email.
-
-
Secondly, by default, sendmail will only accept and send email for 'localhost'
on a default RedHat 7.2 server so we need to disable that so we can send mail to others.
-
-
Add your domain name[s] to /etc/mail/local-host-names and restart sendmail:
-
- service sendmail restart
-
-
6] Install Squirrelmail:
- Grab the 2 latest rpms from http://www.squirrelmail.org and install them.
Add your domain name to Squirrelmail by running the admin script:
-
- /var/www/html/webmail/config/conf.pl
-
- Select [2] then [1] and change to your FQDN. Save and exit.
-
-
7] Add some normal users:
-
Add the users the regular way now and set them up with a password. If you'd like, you can set their
default shell to /bin/false in the /etc/passwd file and dis-allow them a shell login.
-
-
8] Login!
- If all the above was done you can browse your server from a remote PC with an SSL enabled browser:
-
- https://123.456.789.012/webmail/
-
- Login, go to 'options' [at the top of the main screen] and setup your personal settings now. [you need an accurate Reply To: ]
-
-
9] You're done!
- That's all there is to it.
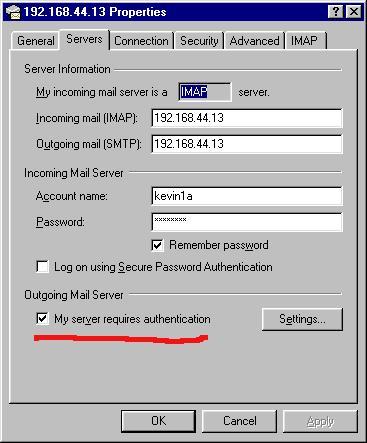
You can also access the server remotely from Outlook, Evolution, Sylpheed etc, by enabling 'IMAP' and 'SMTP Server Requires Auth...'
If you don't, your mail will come back with a 'Relaying Denied' error.
-
 -
-
10] Check out the Squirrelmail website for great plugins!
-
'Plugins' are what make Squirrelmail really shine!
Many cool features are easily added by extracting the plugins to
/var/www/html/webmail/plugins and going back in to the admin script and enable the plugin listed there.
-
-
You can also setup centralized 'filters' for your IMAP users by using 'Procmail' so each email
client won't have to set them up seperatly.
-
- Be sure to think about any additional firewall or security issues you may wish to add.
-
- Kevin Brouelette
- kevin1a at varlog dot net
^ top ^
|
|
The LRP is a relatively new Linux project that is creating a lot of interest.
Basically it is a one diskette operating system that when booted will enable
a properly equipped CPU (with two NIC's) to operate as a full fledged router
and software firewall.
To quote Mastering RedHat Linux 6.0:
"...designed as a minimalist Linux installation, the Linux Router Project's
distribution of Linux can fit on a single 1.44MB floppy disk for most sites
and provides all the components needed to route between two Ethernet LANs
or between an Ethernet LAN and the Invernet via PPP".
One of our members, George Toft, has put a fair amount of time installing
several instances of LRP and has worked up an informative web
page to make his configuration scripts available. Check it out.
The main page for LRP is: http://www.linuxrouter.org
^ top ^
|
|
Hard Drive Imaging
Download Kevin's presentation from a recent OCLUG meeting
^ top ^
|

Home
Meetings
Installfest
News
Hints & Tips
IRC
Links
Library
LUGNuts List
Subscribe
Other L.A. Area Lugs
Usergroup
HOWTO
Powered by:


|
|